Magnetic Flux Leakage Testing (MFLT) is a highly effective and widely used method for assessing the integrity of black bars, particularly those made from ferromagnetic materials such as carbon or alloy steel. This non-destructive testing technique plays a vital role in ensuring the structural soundness of these bars, which find application in diverse industries.
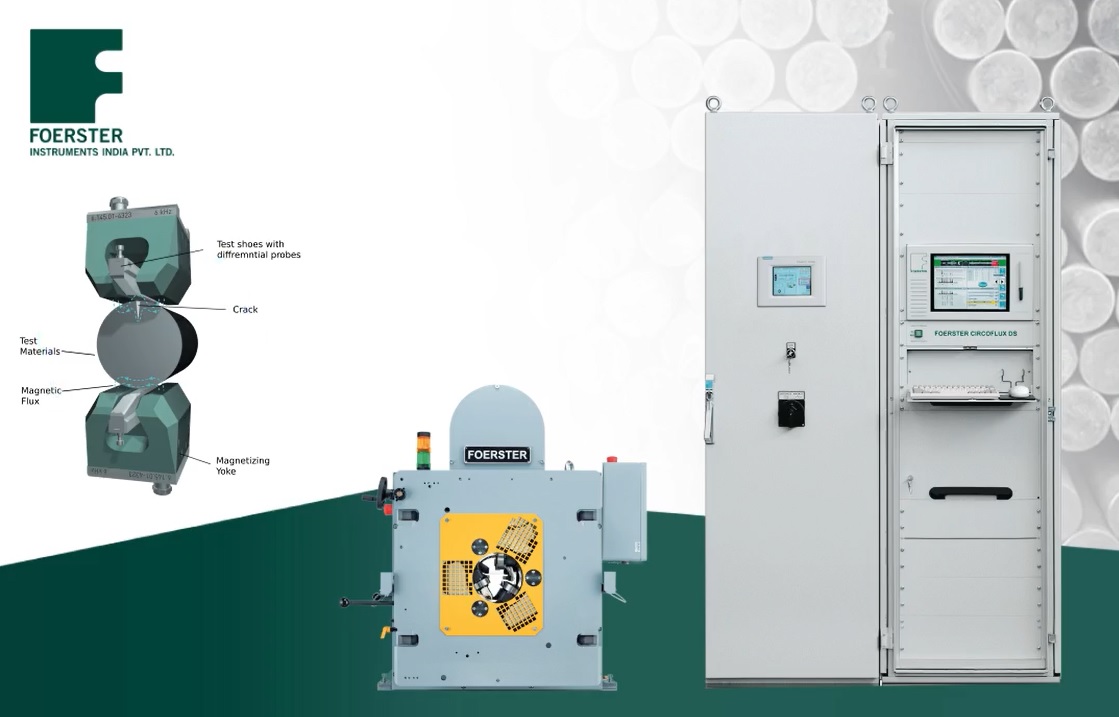
The principle underlying MFLT revolves around the interaction between a magnetic field and the ferromagnetic material being examined. In the case of black bars, the material is magnetized, creating a uniform magnetic field throughout the surface. Any discontinuity or defect in the material, such as surface cracks, corrosion, or other structural irregularities, leads to a leakage of magnetic flux. The specially designed MFLT probes capture these deviations.
.jpg)
This sensitivity allows for the early detection of potential issues, preventing the escalation of defects that could compromise the structural integrity of the bars. Moreover, the testing process is rapid and efficient, enabling the inspection of large quantities of black bars without causing significant delays in production.
The Foerster make “CIRCOFLUX” sensor systems work with the Magnetic Flux Leakage method that is recommended in the European standard EN 10221 “Surface quality classes for hot-rolled bars and rods – Technical delivery conditions”. The Alternating Field Magnetic Flux Leakage (MFL) is the most sensitive method to detect surface defects in hot-rolled ferrous bars. It ensures the detection of even the smallest longitudinal-oriented, crack-like defects.
.jpg)
The CIRCOFLUX Sensor system is offered in various sizes. They are used for a material diameter range of approx. 10 to 180 mm
Sensor system Ro 75 : material diameter range 10 to 75 mm
Sensor system Ro 100: material diameter range 10 to 105 mm
Sensor system Ro 130: material diameter range 15 to 130 mm
Sensor system Ro 180: material diameter range 20 to 180 mm
The test lever is made of high-strength aluminium. The AC-field yoke is bolted rigidly to the test lever. By contrast to magnetizing without physical contact, the test piece surface is scanned with physical contact. The test lever is mounted so that it can swivel and is kept in the test position by means of a spring.
The test head consists of a pivoted support frame and the test shoe with the probe unit (3) bolted onto the support frame. The contact faces of the test shoe housing have tungsten carbide protection strips. The entry and exit ends are protected by ceramic sliding strips
There are two AC-field yokes oppositely located in the rotating disc. The yokes are in a sturdy, dustproof housing. They have protective pressure pads (2) at the entry and exit ends, made of case-hardened steel, to protect against damage resulting from the test material
Automatic dimension adjustment is available in Ro 100 and Ro 130
In conclusion, CIRCOFLUX stands out as a reliable and cost-effective solution for evaluating the quality and integrity of black bars. Its ability to provide quick, accurate, and non-destructive assessments positions it as a valuable tool in ensuring the safety and reliability of structures and products across diverse industries.
To Automate your NDT Inspection & to get more information, please get in touch with our Sales Team.
.jpg)
.jpg)


